Photo from Unsplash by Brina Blum
Do you remember the Windows BSOD (Blue Screen Of Death) errors? I do. Now, while I don’t recall the exact date, I do remember why I installed Linux the first time. I was reading through a forum post, researching yet another Windows BSOD error. Sarcastically, someone posted that the solution was to remove Windows entirely and install Linux. The comment wasn’t serious; nevertheless, I was curious…
Shortly after, I was on the Ubuntu website and following steps for installing Linux on a desktop/laptop. To me, it was shocking that there was a 100% free OS (Operating System) with built-in software that could accomplish the same tasks I was doing on my Windows machine – with no BSOD!
While the Ubuntu Linux distro and instructions are great, I prefer it for laptop/workstation use as it has an intuitive desktop environment. Instead, for headless server use, I recommend CentOS 7 – this is the distro I’ve seen most for production environments; so, we’ll be setting up a fresh CentOS 7 installation here.
OVERVIEW
We will walk through each step to get CentOS 7 set up on our laptop, desktop, or server from scratch. The first part of this involves preliminary steps: preparing the computer. The second part will be all software: the installation itself.
Afterwards, we’ll be able to log in to our fresh installation of CentOS 7 which will enable us to explore and install whatever services we want! Old or unused computers are great for testing – a basic Linux install won’t need many resources anyway.
Outline
- Preliminaries
- Backup all your files
- Configure BIOS settings
- Install CentOS 7
- Begin Installation
- Format Hard Drive
- Configure Network
- Set Up User Accounts
- Reboot and Log In
Prerequisites
- Installation Media (USB flash drive with CentOS 7 .iso written to it)
- A computer (desktop, laptop, rack server, etc.), with Internet access, to install Linux on
- Basic knowledge of computer hardware, Windows, and networking
PRELIMINARIES
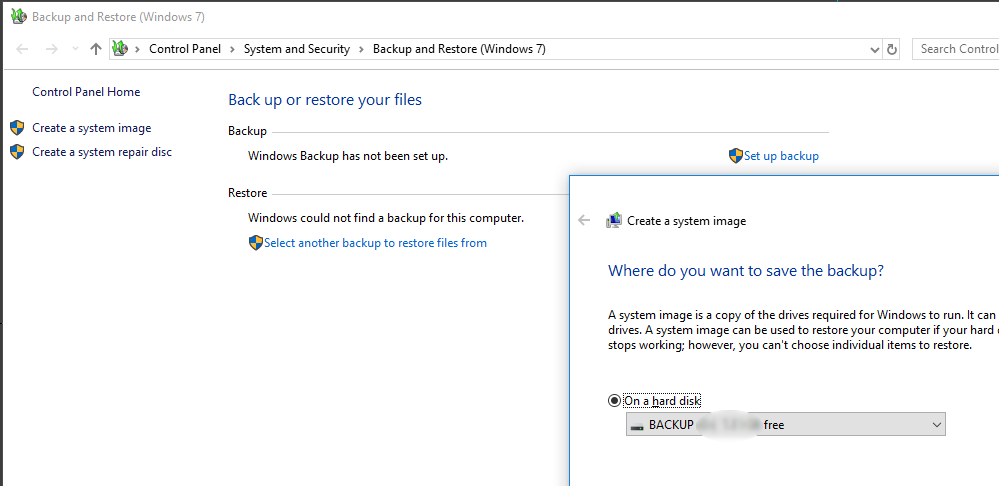
Back Up Your Files
First, before making any significant modifications to a system, it’s always good practice to back up all of your files. In this scenario, you’ll be completely overwriting the destination computer; so, if you don’t want to lose any data from that system, you’ll need to back it up first.
NOTE: How to create a backup
Here are a couple links for backing up files on Windows:
> windowscentral.com
> howtogeek.com
Configure BIOS Settings
NOTE: BIOS (Basic Input-Output System)
You can think of this as the motherboard settings, which loads prior to the Operating System.
Because everyone’s motherboard is different, the exact steps here will vary; however, the overall process should be similar:
- After you power on the computer, quickly hold (or repeatedly press) the appropriate key to access your BIOS settings.
- Find the “boot sequence”, “boot order”, or similarly labeled section.
- So the Installation Media loads, prioritize the USB port before everything else: hard drives, DVD drives, etc.
- Save your settings, exit, and reboot.
NOTE: BIOS Settings
Here are some links for accessing and navigating a computer’s BIOS settings:
> acronis.com
> lifewire.com
INSTALL CENTOS 7
Begin Installation
Now, insert the USB Installation Media into the computer you wish to install CentOS 7 on and plug into the Internet via ethernet cable (or via WiFi later – see below). Reboot the computer.
NOTE: Errors
If you experience any errors at this step, try the following:
> Verify your BIOS settings
> Go back and recreate the Installation Media with the other mode: “DD Image mode”.
You’ll be presented with a couple options – promptly select “Install CentOS 7” before the countdown timer expires. Now, choose your language and click “Continue”.
NOTE: “INSTALLATION SUMMARY” screen
On the next screen – “INSTALLATION SUMMARY” – it may take a minute or so to finish loading all the options.Verify your BIOS settings
Format Hard Drive
WARNING: Potential Loss of Data
These next steps will erase ALL the data from the computer you plugged the flash drive into; so, ensure that you’re either (1) installing on a computer you don’t mind losing all the data on, or (2) have backed up all your files already (see above: Backup System).
Click “INSTALLATION DESTINATION”. Under “Local Standard Disks”, ensure the disk you wish to install Linux on is selected (there may only be one disk here). Under “Other Storage Options: Partitioning”, ensure “I will configure partitioning” is enabled. Click “Done”. You should now be on the “MANUAL PARTITIONING” screen.
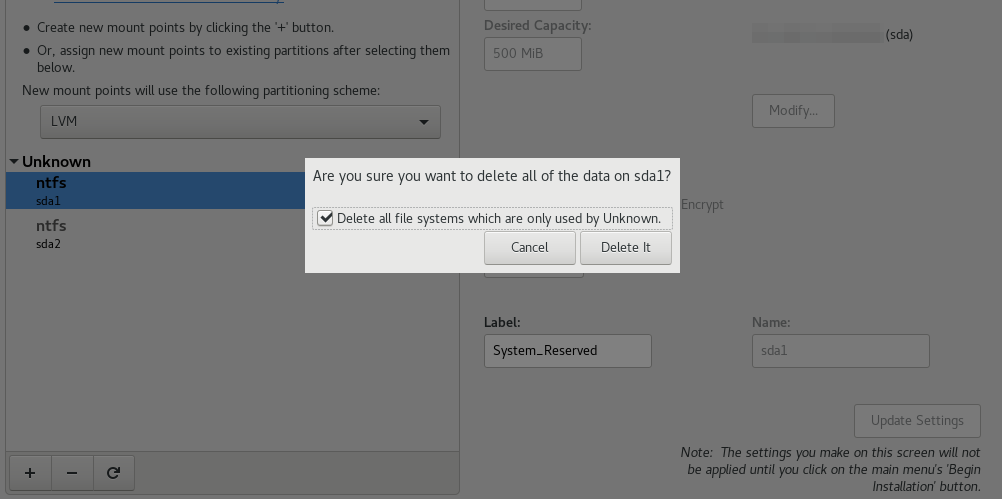
NOTE: If you see a drop-down arrow beneath “LVM”…
Click that drop-down arrow. Then, click the “-” (delete) sign until all partitions are gone and you can’t click it anymore. Afterwards, if you see a pop-up window appear, enable “Delete all file systems which are only used by…” and click “Delete It”.
Select “Click here to create them automatically”, then click “Done” and “Accept Changes”.
Configure Network
Click “NETWORK & HOST NAME”. Then, on the left, select the network interface you want to use (there’s likely only one selection here anyway).
NOTE: WiFi
If you intend to use the wireless card for this computer, go ahead and select “Wireless” here. For “Network Name”, click the drop-down box and select your WiFi SSID. A pop-up will appear prompting you for the WiFi password – enter it and click “Connect”.
In the top-right, ensure the network interface is toggled “ON”. If configured correctly, it’ll say “Connected” near the top-middle of the screen.
NOTE: Static IP Address
Optionally, instead of the default – automatic DHCP – you may set a static IP address here:
1. Click “Configure…”, then “IPv4 Settings”.
2. For “Method:”, select “Manual”.
3. Click “Add”, then fill out the “Address”, “Netmask”, and “Gateway”; for example: “192.168.1.100”, “24”, “192.168.1.1”.
4. For “Additional DNS servers”, enter one or more, separated by commas; for example: “192.168.1.1, 8.8.8.8, 8.8.4.4”.
5. For “Additional Search domains”, enter your domain; for example: “domain.lan”.
Enter a hostname for this machine; for example: “centos01.domain.lan”. Click “Apply”, then “Done”. The remaining default settings should be fine; so, click “Begin Installation”.
Set Up User Accounts
While the install is running in the background, you can now set up the initial administrative account. Click “ROOT PASSWORD” and enter a strong password for the “root” user account. Enter it again to confirm and click “Done”.
NOTE: “root” user account
On Linux, the “root” user is like the “Administrator” account on Windows: it has permission to do anything on that computer.
Skip the standard “USER CREATION” for now – that can be done later. Wait for the installation to complete.
NOTE: Finish Configuration
If you see “Finish configuration”, click it, and the installer will wrap up a few things.
Reboot and Log In
Finally, click “Reboot” and quickly remove the installation media. After a short while, you’ll be presented with a login screen asking you to type in the username. Type root and hit Enter. When prompted, enter the password you set earlier and hit Enter.
To turn the computer off, use the shutdown command with the -h option & now parameter, then hit Enter:
[root@centos07 ~]# shutdown -h nowAt this point, you may revert the BIOS to its original settings.
CONCLUSION
CentOS 7 is installed! Without skipping any steps, that is the quickest, most direct way I can think of to get CentOS installed from scratch:
- configure the bios settings and plug in the installation media
- configure the hard drive, network, and root account
- reboot and log in
Note: Further Reading
Here is a link to the Ubuntu distro installation, which has similar steps.
Now, we can begin adding/installing services, which is where the real benefits start to manifest. Feel free to leave a comment. Did you find this post clear to understand?