
Photo from unsplash.com by conscious_design
When first looking up how to use certain Linux commands, I remember feeling overwhelmed and confused by all the different descriptions, syntaxes, and examples provided; after all the reading, I would still be uncertain of how to properly use the command which resulted in a lot of trial & error. While the trial & error approach does provide a level of experience and clarity, had I first understood the basics of Linux command structure, learning would have been faster. So, I figure it’s a good idea to cover those basics here.
OVERVIEW
In this post, we’ll review the three types of arguments that make a Linux command. This will enable us to better grasp any material that explains proper use of a particular command.
NOTE: System Specifics
All the following commands were tested on a CentOS 7 VM. If you are using a different system, your results may vary.
Outline
- Arguments
- Commands
- Example: hostname
- Example: df
- Options
- Longhand Options
- Shorthand Options
- Common Options
- Combining Options
- Parameters
- Single Parameter
- Multiple Parameters
Prerequisites
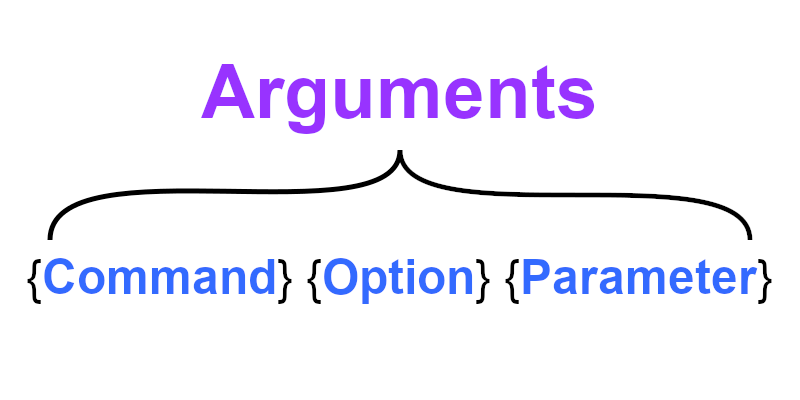
ARGUMENTS
Every Linux command that is executed from the CLI (Command Line Interface) consists of one or more “parts”. These parts are called “arguments” and, typically, they are separated by spaces. An argument can be one of three things: the command itself, an option, or a parameter.
NOTE: Nomenclature
Some debate exists around appropriate definitions for arguments, commands, options, and parameters.
Each type of argument is not always needed; oftentimes, only a single argument is required to successfully execute a command; i.e., the command itself. For example, executing the free command from the CLI will display the system’s memory capacity and usage.
[penguin@centos7 ~]$ free
              total        used        free      shared  buff/cache   available
Mem:        1869176      171276     1575032        8696      122868     1557320
Swap:       2097148           0     2097148
Other times, depending on what you’re doing, a command can be quite long, with many arguments:
[penguin@centos7 ~]$ cp -a --force /tmp/something.out /var/log/messages /mnt/share/file.txt ~/my_directory/
NOTE: Delimiter
By default, each argument (“cp”, “-a”, “–force”, etc.) is delimited/separated by a space; however, there are some circumstances that change or ignore this behavior.
COMMANDS
Know that, when referring to “commands”, this can either mean (1) an executable file on the Linux system or (2) a general term for the execution of any commands with their arguments at the CLI.
To illustrate, it is accurate to say that cp is a Linux command; also, it is equally accurate to be asked to execute the following “command” even though it has several arguments: cp -a --force /tmp/something.out /var/log/messages /mnt/share/file.txt ~/my_directory/.
Typically, a stand-alone command is the first argument that is typed when executing from the Linux CLI – The next couple subsections will exhibit some of these.
Example: hostname
For example, when executed by itself, the hostname command will, as expected, display the hostname of the system:
[penguin@madmincentos7 ~]$ hostname
centos7
Example: df
Also, try df (short for “disk free”), which will display the system’s disk usage:
[penguin@centos7 ~]$ df
Filesystem              1K-blocks    Used Available Use% Mounted on
devtmpfs                   922908       0    922908   0% /dev
tmpfs                      934588       0    934588   0% /dev/shm
tmpfs                      934588    8696    925892   1% /run
tmpfs                      934588       0    934588   0% /sys/fs/cgroup
/dev/mapper/centos-root  28084840 1818764  26266076   7% /
/dev/sda2                 1038336  271820    766516  27% /boot
/dev/sda1                  204580   11448    193132   6% /boot/efi
tmpfs                      186920       0    186920   0% /run/user/0
OPTIONS
Next, are command options. Options are added to commands which alter how that command works. Options are usually defined by a combination of dashes and words/phrases. Moreover, for a single command, there can be many different options available.
Longhand Options
As a first example, the --domain option can be applied to the hostname command, which will show the domain and TLD (Top Level Domain) of the system: hostname --domain.
[penguin@centos7 ~]$ hostname --domain
domain.lan
Also, try using the --ip-address option to display the ip address of the system:
[penguin@centos7 ~]$ hostname --ip-address
192.168.1.123
Shorthand Options
While typing out the full option works just fine, it can get laborious when executing many commands. Luckily, shorthand equivalents for options are commonplace. For example, to produce the same results, -d can be used in place of --domain and -i can be used instead of --ip-address:
[penguin@centos7 ~]$ hostname -d
domain.lan
[penguin@centos7 ~]$ hostname -i
192.168.1.123
NOTE: Flags & Tacks
Command options are sometimes called “flags”. Even less common, the dashes in options are sometimes called tacks; for example, -h could be referred to as “tack h”.
Common Options
While most options are unique and specific to their respective commands, some options are so simple, useful, and generic that they’re found among most commands. For example, the --help option for displaying help text about the command itself:
[penguin@centos7 ~]$ hostname --help
Usage: hostname [-b] {hostname|-F file}         set host name (from file)
       hostname [-a|-A|-d|-f|-i|-I|-s|-y]       display formatted name
       hostname                                 display host name

       {yp,nis,}domainname {nisdomain|-F file}  set NIS domain name (from file)
       {yp,nis,}domainname                      display NIS domain name

       dnsdomainname                            display dns domain name

       hostname -V|--version|-h|--help          print info and exit
...
[penguin@centos7 ~]$ df --help
Usage: df [OPTION]... [FILE]...
Show information about the file system on which each FILE resides,
or all file systems by default.
...
Also, the --version option will quickly output the version of the command/software.
[penguin@centos7 ~]$ hostname --version
hostname 3.13
[penguin@centos7 ~]$ df --version
df (GNU coreutils) 8.22
Copyright (C) 2013 Free Software Foundation, Inc.
License GPLv3+: GNU GPL version 3 or later <http://gnu.org/licenses/gpl.html>.
This is free software: you are free to change and redistribute it.
There is NO WARRANTY, to the extent permitted by law.

Written by Torbjörn Granlund, David MacKenzie, and Paul Eggert.
NOTE: Commonplace Shorthand Options
Even though --help and --version are commonplace, be aware that options still vary from command to command, especially the shorthand options. For example, while hostname -h will display the help text, ls -h will list file sizes in human readable form; so, be sure to double check before running any risky commands.
Combining Options
Now that we’ve seen how individual options work, what about combining options? Two or more options can often be combined to produce a more specific result that you might be looking for. For example, take the --human-readable and --inodes options for the df command: df --human-readable will display the disk usage in abbreviated form (“G” for gigabytes, “M” for megabytes, etc.).
[penguin@centos7 ~]$ df --human-readable
Filesystem               Size  Used Avail Use% Mounted on
devtmpfs                 902M     0  902M   0% /dev
tmpfs                    913M     0  913M   0% /dev/shm
tmpfs                    913M  8.6M  905M   1% /run
tmpfs                    913M     0  913M   0% /sys/fs/cgroup
/dev/mapper/centos-root   27G  1.8G   26G   7% /
/dev/sda2               1014M  266M  749M  27% /boot
/dev/sda1                200M   12M  189M   6% /boot/efi
tmpfs                    183M     0  183M   0% /run/user/0
On the other hand, the df --inodes option will display disk usage inodes:
NOTE: Inodes
An inode (index node) stores metadata for Linux files.
[penguin@centos7 ~]$ df --inodes
Filesystem                Inodes IUsed    IFree IUse% Mounted on
devtmpfs                  230727   367   230360    1% /dev
tmpfs                     233647     1   233646    1% /dev/shm
tmpfs                     233647   475   233172    1% /run
tmpfs                     233647    16   233631    1% /sys/fs/cgroup
/dev/mapper/centos-root 14049280 53547 13995733    1% /
/dev/sda2                 524288    38   524250    1% /boot
/dev/sda1                      0     0        0     - /boot/efi
tmpfs                     233647     1   233646    1% /run/user/0
When used together and in sequence, df --human-readable --inodes will display inodes in human readable form:
[penguin@centos7 ~]$ df --human-readable --inodes
Filesystem              Inodes IUsed IFree IUse% Mounted on
devtmpfs                  226K   367  225K    1% /dev
tmpfs                     229K     1  229K    1% /dev/shm
tmpfs                     229K   475  228K    1% /run
tmpfs                     229K    16  229K    1% /sys/fs/cgroup
/dev/mapper/centos-root    14M   53K   14M    1% /
/dev/sda2                 512K    38  512K    1% /boot
/dev/sda1                    0     0     0     - /boot/efi
tmpfs                     229K     1  229K    1% /run/user/0
NOTE: Option Order
In the previous example, the order of the options does not matter: df --human-readable --inodes and df --inodes --human-readable produce the same result; however, this is not always the case.
To take these examples one step further, you may combine the shorthand options. The shorthand for df --human-readable is df -h and the shorthand for df --inodes is df -i. To combine the options, use the same dash for both options: df -hi (or df -ih).
[penguin@centos7 ~]$ df -hi
Filesystem              Inodes IUsed IFree IUse% Mounted on
devtmpfs                  226K   367  225K    1% /dev
tmpfs                     229K     1  229K    1% /dev/shm
tmpfs                     229K   475  228K    1% /run
tmpfs                     229K    16  229K    1% /sys/fs/cgroup
/dev/mapper/centos-root    14M   53K   14M    1% /
/dev/sda2                 512K    38  512K    1% /boot
/dev/sda1                    0     0     0     - /boot/efi
tmpfs                     229K     1  229K    1% /run/user/0
PARAMETERS
Finally, parameters are arguments where you can define custom information for a command and/or option.
Single Parameter
Perhaps the simplest example of parameter usage is with the echo command. The echo command simply outputs/displays whatever text you type after the command: echo <AnythingYouType>. In this example, echo is the command and Hello! is the parameter:
[penguin@centos7 ~]$ echo Hello!
Hello!
The ls command, short for “list”, can be used to display the files inside of a directory you specify. The syntax for this would be: ls <SomeDirectory>. For example, if you have two directories – named foo & bar – ls is the command and foo & bar are the parameters.
[penguin@centos7 ~]$ ls foo
large.txt  medium.txt  small.txt
[penguin@centos7 ~]$ ls bar
large.jpg  medium.jpg  small.jpg
Multiple Parameter
Many commands and options can accept multiple parameters simultaneously. In the previous example, you used ls to list the files in two different directories with separately executed lines. However, you could just use one command with both directories as parameters: <Command> <DirectoryOne> <DirectoryTwo>.
[penguin@centos7 ~]$ ls foo bar
bar:
large.jpg  medium.jpg  small.jpg

foo:
large.txt  medium.txt  small.txt
Another example of defining multiple parameters can be with the find command. By itself, the find command will list all the files and directories in your current folder:
[penguin@centos7 ~]$ find
.
./.bash_logout
./.bash_profile
./.bash_history
./.lesshst
./.bashrc
./.viminfo
./.pki
./.pki/nssdb
./bar
./bar/large.jpg
./bar/medium.jpg
./bar/small.jpg
./foo
./foo/large.txt
./foo/medium.txt
./foo/small.txt
Now, if a folder is entered as a parameter, find will list all the files and directories in that folder only: find <SomeFolder>. Here, foo is the parameter for the find command:
[penguin@centos7 ~]$ find foo
foo
foo/large.txt
foo/medium.txt
foo/small.txt
Next, if you add the -size option with a corresponding number (“N”) followed by the letter k, you can find all files above “N” size in Kilobytes: find -size <N>k. In this example, +10k is the parameter for the -size option. From the output, we can see that only the large.txt and medium.txt files are larger than 10 Kilobytes:
[penguin@centos7 ~]$ find foo -size +10k
foo/large.txt
foo/medium.txt
NOTE: String
A string refers to a series of characters: lowercase, uppercase, numbers, and/or symbols.
To take it a step further, you can add the -name option which finds files using a string you specify: find -name <YourSearchString>. Your custom search string will be the parameter for the -name option. So, if you want to only find files with the word “medium” in it, the command will now look like this:
[penguin@centos7 ~]$ find foo -size +10k -name "*medium*"
foo/medium.txt
NOTE: Wildcard
n this example, the asterisk/ star symbol (*) is a wildcard, meaning that any text will count as a match. Since we used a wildcard both before and after the word “medium”, any of these example file names would count as a match for our search string:
– medium
– medium.txt
– somemedium
– foomediumbar.csv
To review, the complete find command looks like find foo -size +10k -name "*medium*", which translates to <Command> <Parameter> <Option> <Parameter> <Option> <Parameter>.
CONCLUSION
Now that we’ve reviewed the different types of arguments, comprehending how to put commands together in order to get the result you want should be easier:
- Commands
- Options
- Parameters
Remember that the purpose of this article is to gain an understanding of the various arguments. As such, the specific commands, options, and parameters used in the examples are inconsequential; knowing that, go ahead and try out these commands on a Linux system of your own and see if you can identify the different CLI arguments.