Photo from Unsplash by Sara Kurfeß
This post will explain the simplest method I know for creating the CentOS 7 Linux Distribution installation media. Years ago, I remember reading other posts about how to create installation media. They were often complex and required advanced prerequisite knowledge, which meant additional research for me. I found myself clicking several links and had many browser tabs open to accomplish something simple: creating installation media for Linux.
Note: Linux Distribution
A Linux Distribution – sometimes called a “distro” or “flavor” – is a prepackaged operating system built on the Linux kernel. Each distro will have varying aspects: desktop interface, installed software, default configuration, and more. However, because of the common Linux kernel they share, the underlying operations and basic functionality will be similar. There are many different, available Linux distros because it’s open source; additionally, many distros are simply based on other distros.
OVERVIEW
In this short tutorial, we’ll create installation media for CentOS 7 on a USB flash drive. This is the physical requirement for the actual software installation of CentOS 7 on a computer.
Outline
- Prepare a USB Flash Drive
- Backup the Flash Drive
- Format the Flash Drive
- Download
- Download the CentOS 7 .iso File
- Download the Rufus Software
- Write to the Flash Drive
- Open the Rufus Software
- Make Selections
- Remove the Flash Drive
Prerequisites
- Basic knowledge of computer hardware and the Windows OS (Operating System)
- A Windows computer with Admin privileges and an Internet connection
- An 8 GB (or greater) USB flash drive
PREPARE A USB FLASH DRIVE
Backup Files from the USB Flash Drive
First, find a USB flash drive that’s at least 8GB in size (That should be enough to hold all the data from the .iso file we’ll download later on). Plug it into your Windows computer and, if you want to keep the data from the flash drive, copy all the files from it to your local computer.
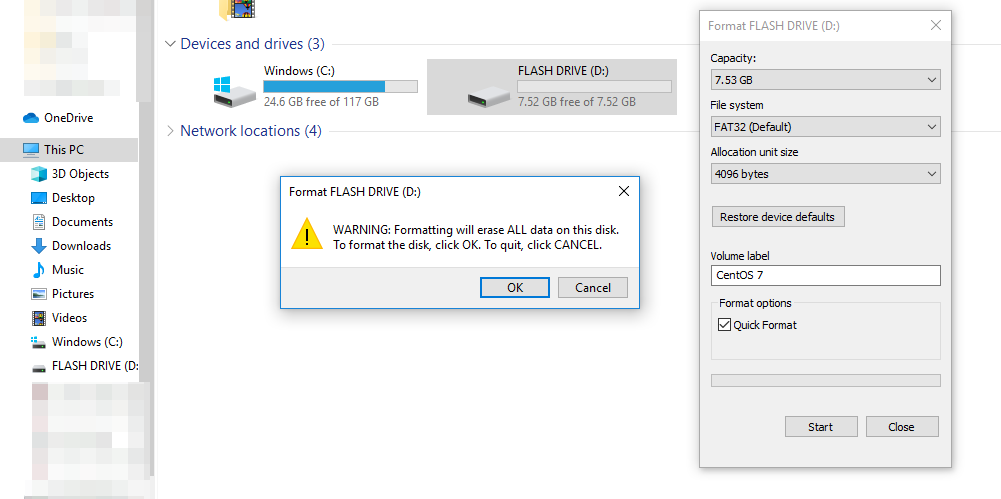
Format the Flash Drive
WARNING: Potential Loss of Data
The device/drive that you format in this step will erase ALL data on it; so, be sure that you’re selecting the correct device and back up any files you want from it first.
To begin formatting the flash drive, right-click the drive and select “Format…”. Enter any name for the “Volume label”, the default settings for everything else should work fine. Click “Start” and, at the warning pop-up, click “OK”.
NOTE: Wait Time
The larger the flash drive capacity, the longer this will take to finish.
Whenever you see “Format Complete.” click “OK” and “Close”.
DOWNLOAD
Download the CentOS 7 .iso File
Next, we’re going to download an .iso file from the official CentOS site. Find and select/click “DVD ISO” (Ignore the minimal ISO which is more involved because it requires additional setup steps). After clicking that link, you should be directed to a list of mirror sites.
NOTE: Mirror Sites
When a website has a popular download to offer, they may opt to use “mirrors”. Mirrors are other sites that let you download the same file. This is to prevent the initial site from becoming overwhelmed with download traffic. The closer, geographically, the download site is to your computer, the faster the download will be. Personally, I prefer sites that end in “.edu”.
Select any mirror and download the .iso file.
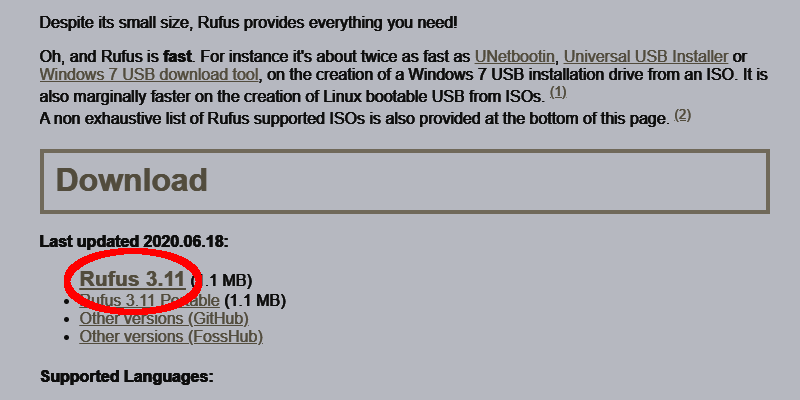
Download the Rufus Software
Additionally, for this next step, we’ll need to download and install a piece of software called Rufus. Scroll down and download the latest version (not the “portable” or “other” versions).
WRITE TO THE FLASH DRIVE
Open the Rufus Software
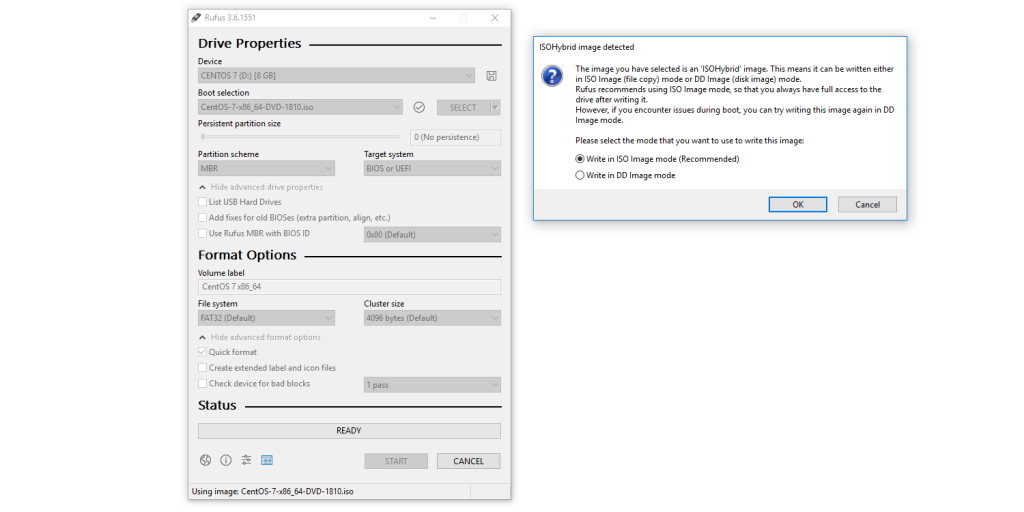
Then, run the Rufus .exe file (likely in your “Downloads” folder). At this point, you’ll be prompted for Admin privileges; so, enter your administrative password and continue.
Make Selections
WARNING: Potential Loss of Data
Again, the device/drive that you select here will overwrite ALL data on it; so, be sure that you’re selecting the correct device and back up any files you want from it first.
Select the appropriate options:
- “Device”: << The USB flash drive you formated earlier >>
- “Boot selection”: “Disk or ISO image (Please select)”
- “SELECT”: << Click and open the .iso file you downloaded from the previous step >>
Defaults should be fine for everything else. Click “START” at the bottom.
NOTE: Hybrid .iso Image
If you get prompted about a hybrid .iso image, proceed with the default selection – “ISO Image mode” – and click “OK”. There may be a pop-up warning about data loss, click “OK” to accept and continue.
This can take a while – When complete, click “close”.
Remove the USB Flash Drive
Make sure the Rufus software is closed. Right-click the USB flash drive and click “Eject”. Physically remove the flash drive from the computer.
CONCLUSION
We’re done! Now that we have the installation media on our flash drive, we’re ready to install CentOS 7 on any computer with a USB port. That is the fastest, most direct way I can think of to build the CentOS 7 installation media from scratch:
- Prepare a USB Flash Drive
- Download the .iso file and Software
- Write to the Flash Drive
NOTE: Further Reading
Here is where you can find the Ubuntu distro instructions, which are similar.
Did you find these instructions easy to follow? Feel free to comment below.