Photo from FOSSnotes by Gemini
Chances are, you’re not running Linux on your laptop or desktop. As such, if you have Linux servers to manage, you’ll need a Linux terminal emulator installed so you can SSH into those hosts. I’ve used many terminals in the past – Below are a few that I’d like to expand on so you might try them out yourself and determine which one you prefer.
OVERVIEW
In this post, we will briefly explore three different Linux terminals for Windows and how to install them. All of these terminals will enable us to SSH into remote Linux servers; additionally, some will allow us to run a limited set of Linux commands from the Windows OS.
Outline
- Putty
- About Putty
- Installing Putty
- Using Putty
- Git Bash
- About Git Bash
- Installing Git Bash
- Using Git Bash
- Windows Sybsystem for Linux (WSL)
- About WSL
- Installing WSL
- Using WSL
Prerequisites
- Basic Windows Knowledge
PUTTY
About Putty
First up, is Putty. Putty has been around for a long time. As such, it was the first terminal I used for Windows and continued to do so for a long while. It’s not as convenient as the other terminals, which is why I’ve since abandoned it; however, considering how commonplace it is, it’s worth mentioning.
Installing Putty
NOTE: 32-bit vs 64-bit
For this next section, you’ll need to know whether your Windows OS is 32-bit or 64-bit. To determine this, first, open Windows File Explorer. Then, right-click “This PC” and select “Properties”. This info will be displayed next to “System type:”.
Go to the official Putty site and click the PuTTy download link which, currently, will take you to another site. Under “Package files”, download the .msi file by clicking the link for the corresponding version of your Windows OS: 32-bit or 64-bit. Run the .msi installer and navigate through the installation prompt (the defaults should be fine).
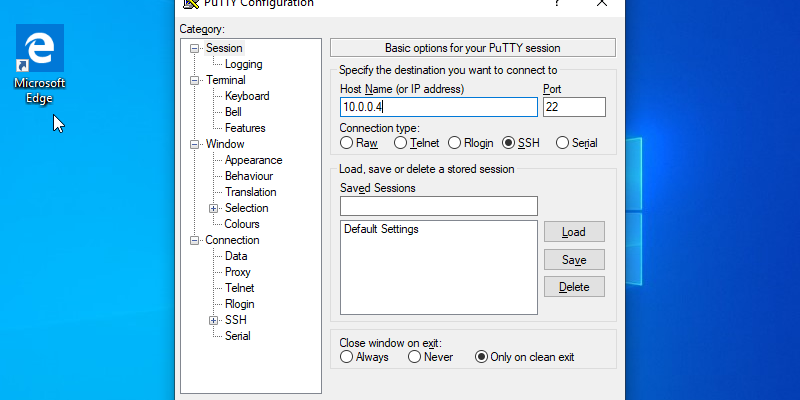
Using PuTTy
Search for and open the PuTTy application. Fill in the minimum required fields as such:
- Host:
<Hostname>or<IPaddress> - Port:
22(unless using a non-default port)
Click “Open”.
NOTE: host key
You may get a pop-up warning you about a host key and registry. This is because the local system does not have any existing record of the remote host; i.e., you’re connecting for the first time. Simply double-check that you’ve entered the correct Hostname/IP Address and click “Yes” to continue.
Another window will appear with a prompt: “login as:”. Enter the remote, Linux username and hit Enter. When prompted, enter the password and now you can control the remote Linux machine from there.
GIT BASH
About Git Bash
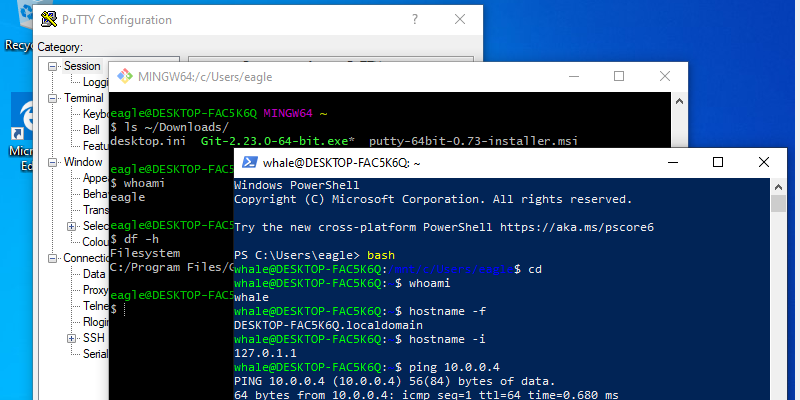
Next is Git Bash. Git Bash is designed, as expected, for use with the Git version control system. After stumbling upon it, this was my go-to for some time. It’s not as tedious as Putty and you can, in a limited capacity, use it to interact with your local OS. Furthermore, it has some useful Git-specific features for coding.
Installing Git Bash
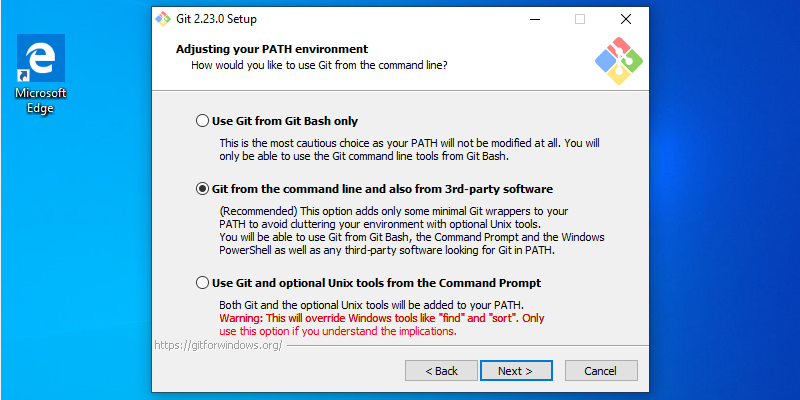
Navigate to the Git website. Select your OS and the installation file will begin to download. Once complete, run the .exe and proceed through the installation. Unless you’re certain of any changes, leave the default options alone.
Using Git Bash
Open Git Bash and, unlike Putty, you will be presented with a terminal right away. You can now interact with your local file system. For example, you can view, move, and delete files with Linux commands as well as SSH into another host.
WINDOWS SUBSYSTEM FOR LINUX (WSL)
About WSL
Last is WSL, which has become available due to Windows 10 updates. The WSL feature allows you to install a Linux distro, like Ubuntu, right on top of Windows. This is similar to Git Bash in that you can interact with the local, Windows file system.
Installing WSL
NOTE: Windows Requirements
For this installation, you’ll at least need Windows 10 updated to the necessary OS patch level that supports WSL; alternatively, just update all the way to the latest. Reboot if necessary.
Search for and Open “Settings”, then select “Update & Security”. In the left panel, click “For developers” and enable “Developer mode”. Read and accept the prompt by clicking “Yes”.
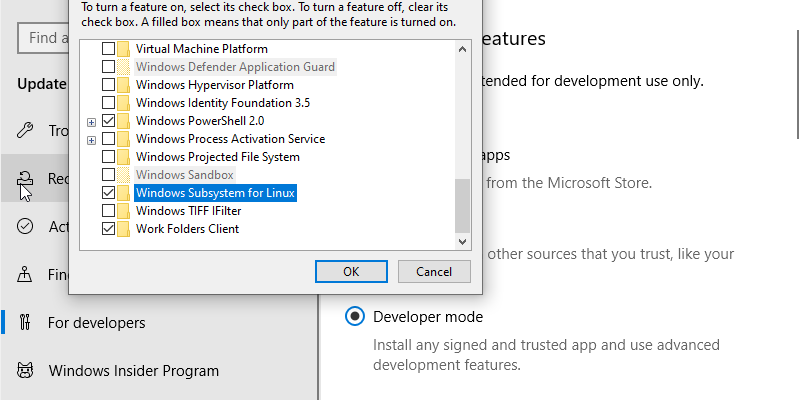
Then, search for “Turn Windows features on or off”. Find and enable “Windows Subsystem for Linux” – click “OK”. When ready, click “Restart now”. You won’t run WSL directly but, now, you have the option to install Ubuntu (A Linux distro). You’re nearly finished.
Open the Windows App store and search for “Ubuntu”, install it, and launch it. This will begin yet another installation process inside a terminal that you’ll need to wait for. Once complete, enter a new username and password – This will be your administrative user when invoking the Ubuntu terminal from Windows. Close the terminal window for now.
Using WSL
There are two ways to reach the Ubuntu terminal: (1) from powershell, or (2) directly. To switch to an Ubuntu terminal from powershell, type bash and hit Enter. Otherwise, just reach the terminal directly by searching for and executing the “Ubuntu” app.
From here, it’s similar to Git Bash; however, instead of git tools, you have some native Ubuntu capabilities.
CONCLUSION
Great! Now we have at least three terminal options to choose from. For each of those terminals, we covered these sections:
- Basic Information
- How to Install the software
- How to get started with the terminal
This list is hardly exhaustive – Some notable mentions: Kitty, MobaXterm, and Solar-PuTTY. Which terminal do you use?